3 First commit
question Questionsobjectives Objectives
- How to initialize a version controlled repository?
- How to make your first commits to that repository?
- Make your own repository, clone into your local computer, make a file, make some changes, add to staging area, commit & push.
- Understand how the different aspects and commands of version control interact with each other
time Time estimation: 1 hour
1. Routine usage
As mentioned in the first chapter, there are three conceptual areas in Git: the development area, the staging area and the commit repository. The routine usage is depicted in the figure below. When we want to save a file from the development area on our computer to the commit repository, we’ll always have to add it to the staging area first, before we can commit it. The usual routine looks like this:
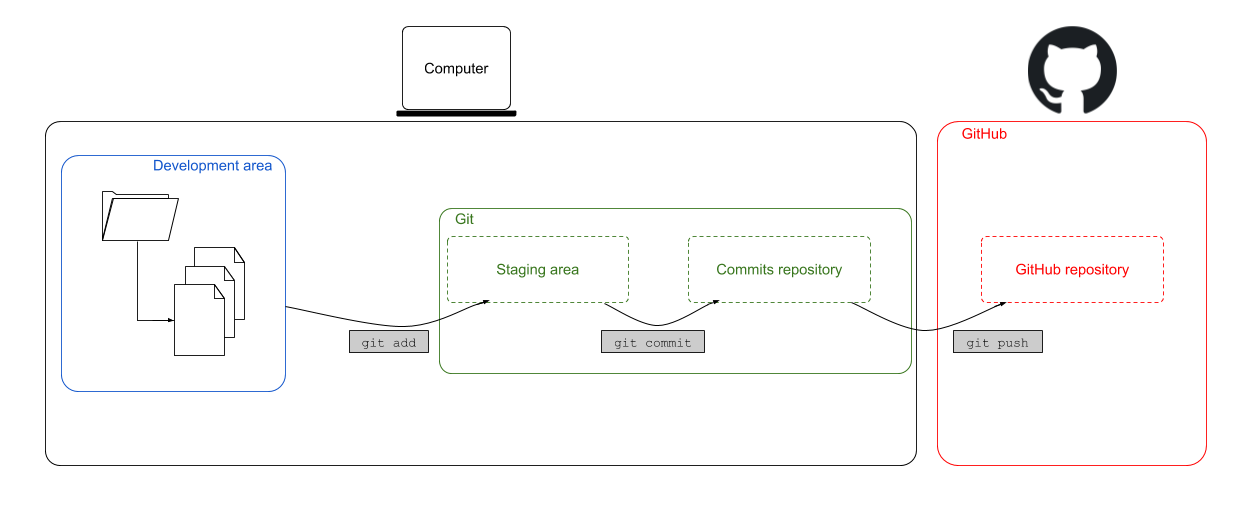
These commands will subsequently add the file <file> to the staging area and then commit it to the commit repository. If we wouldn’t pass along the -m-message parameter, Git would have opened the editor asking to write the commit message there. It’s good practice to write a short, but powerful commit message that helps your future self to determine what has changed in this commit.
The last step is to take these commits, essentially representing the folder with all the committed files, and push them to GitHub. Uptil now we kept track of our code locally on our computer. Why do we want to store this project and all of its files on GitHub? Imagine that you lose your computer now, you’ve also lost your project (and all the files in it). A bit less drastical, if you would just like to show your project to your colleagues or with the whole world, we need to publish it somewhere on the internet. And that is exactly what GitHub does for us. Here’s how it looks like (once everything is set) when we would use the appropriate commands on GitHub.
git add <file>
git commit -m "some text that explains what has changed"
git push
That’s all you need to know: add-commit-push x repeat. This repetition represent 90% of how we interact with Git & GitHub.
Before we can start adding, committing and pushing, we have to start a version controlled project/repository. There are two ways of initializing a new Git repository which only has to be performed once right at the start:
- Clone a GitHub repository (from GitHub): see Section 2
- Initialize Git on a folder on your computer: see Section 4
Both options will work just fine and it depends on your preferences or maybe the situation of the project which one is preferable. The first option can be used if you’re about to start a new project, the second option can be used when you already have some files in a project which you now want to start version controlling.
2. Create a new repository from GitHub
Go to your GitHub homepage and click on the ‘+’ icon in the upper right corner and select ‘New repository’. The following screen will pop up.
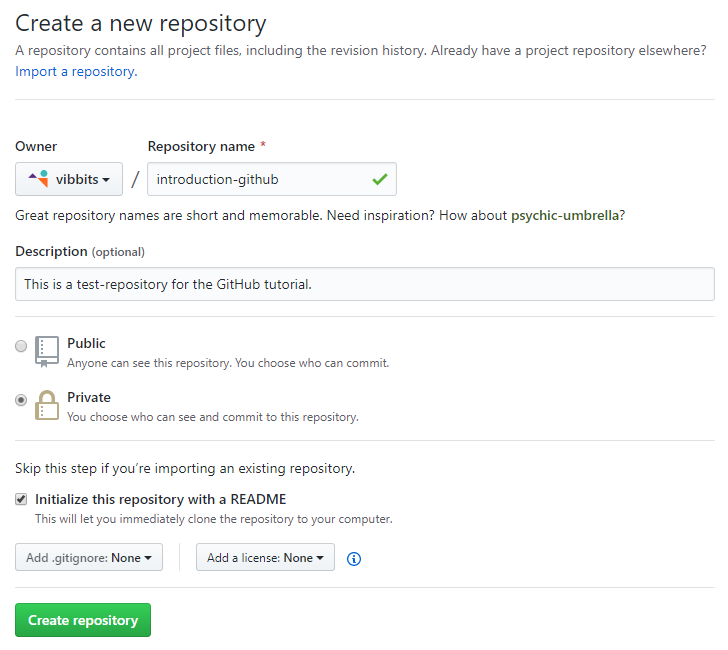
We already filled in a repository name and an optional description. You can choose to already publish your repository, however as this is a meaningless repository, we will choose not to. When you’re about to start a new project, there are three things to consider:
- For a new repository, it’s a good practice to initialize the repository with a README file. This file will eventually include a (general) description about the project, what others can expect to find in the project and how they can use it.
- Adding an
.ignorefile is something we will cover later, however for now it suffices to know that the.ignorefile will contain some code which tells git to exclude certain files from tracking and avoids uploading them to GitHub. - Adding a license makes sense when your project becomes public. It defines under which license the content is made available. More information on licenses is available here.
In our case, we will initialize the repository with a README file and click ‘Create repository’, which will then look like this:
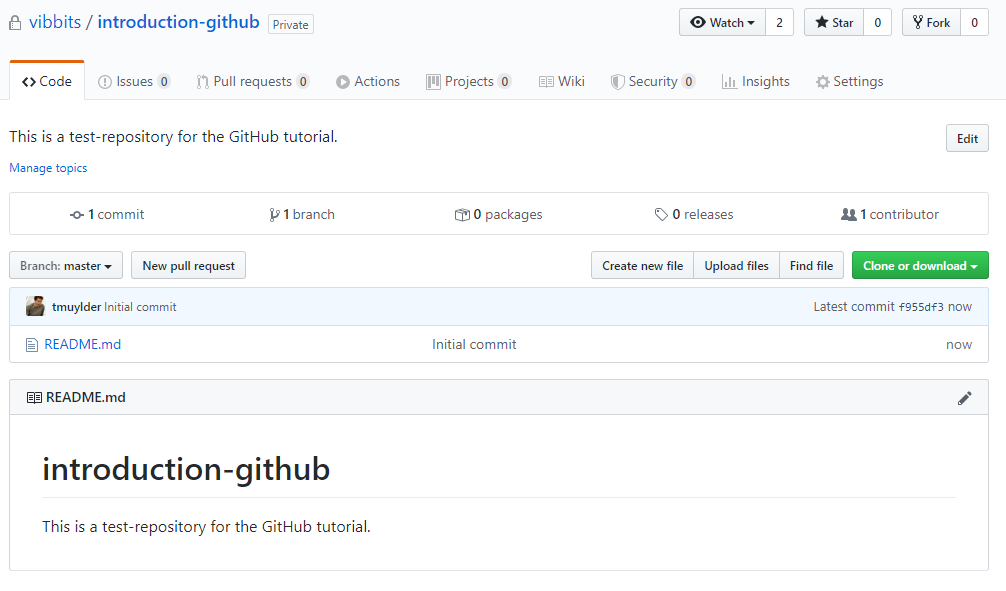
This is the home page of our GitHub repository. From here we can already do a lot, like changing or uploading files. We initialized a GitHub repository with a README file and we can see that we have only one file in this repository: a README.md file. By default the text in this README file is the title of the repository and the description that we created here above. Notice that it’s a Markdown-file as we can see by the .md extension, similar to an ordinary text file on your computer with a .txt extension. Markdown is enriched text allowing us to create formatted text using plain-text. More information related to markdown can be accessed from the Github guides here.
Now that we created the repository in GitHub, we want to work on it on our computer. Therefore we need to download it, i.e. we have to clone it to our computer. Click on the green button ‘Clone’ and choose any of the options:
- Clone: with https link or with SSH. This will download the repository and all its contents, keeping the link to the GitHub repository.
- Open with GitHub Desktop (this might be interesting for you at a later stage).
- Download: will download all of the contents in a zipped file, however loses the connection to the repository.
With the Git Bash (or Terminal), navigate with cd to the folder where you want to keep your project folder and type the following:
git clone <link>
with <link> being the link from GitHub that will look something like this for SSH: git@github.com:username/repository-name.git. This command is only used once in the beginning and creates a new folder on your computer with all the contents from GitHub (the README file).
hands_on Exercise 1
Create a new GitHub repository, give it a name and initialize it with a
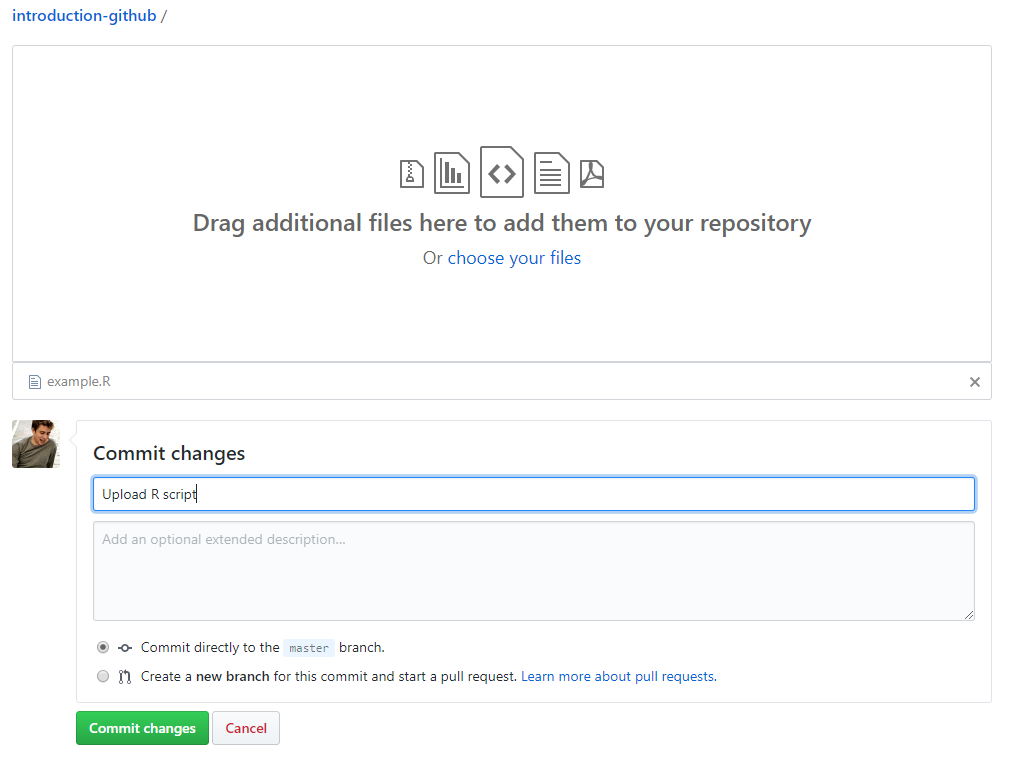
README-file. Upload this file to the repository on GitHub. What is GitHub asking you to do? Which stage is omitted when uploading a file directly to GitHub?Clone the repository to your computer. How many files are there in your local repository?
solution Solution
Click on upload files and drag the file into the screen. GitHub is asking to add a commit message which defines the changes that you’ll do to your repository. In this case we’ll add the very brief Upload R script message. Notice that there is no staging area when you upload a file directly on GitHub.
Click on ‘Commit changes’ and find the two files:
README.mdandexample.Rin your repository. Now, we can find the clone link via the green ‘Clone’ button. In our Terminal we type the following command to start using the repository locally on our computer:git clone <link>in which you change
<link>to the link that you copied from GitHub. There should be two files in your local repository as well.
On a Windows computer we have a folder that contains the following files:

3. Our first commit
Our local copy (clone) of the GitHub repository is now able to communicate with the GitHub repository. Every change within this repository is traceable, whether it is a new file or changes to a file. When we make changes in our local repository (e.g. create a new file), you have to add the file to the staging area first (git add) and then commit it (git commit) before pushing it (git push) to GitHub.
3.1 Staging
Let’s add a new file to our folder on our computer locally. Download this file and add it in the folder where also the plot1.R file is located. It contains some R code for plotting a new figure.
The first thing we will have to do now, is to stage the file into the staging area. Remember that this is an intermediate area before committing the file to the repository. In a next section we will learn why this staging area can be useful.
Now we have two options, depending on the situation:
git add <file>: will add a specific file to the staging areagit add .: will add all the changed or new files to the staging area
In this case, we can choose either of both options as we have only added one file. As this is a new file, git add will not only add it to the staging area, but it will also tell Git that it needs to keep track of changes that happen in this file.
3.2 Committing
Our new file is now in the staging area, ready to be committed. For this, we have to use the following command:
git commit -m "some descriptive yet short message"
We added a parameter -m (message) to the command followed by a descriptive text. This text informs our future selves or our colleagues of what changes were done. In this case it could be: “added plot2.R script”. We make this message as explanatory as possible, yet as short as possible. Some tips and general best practices in writing commit messages are described in this link.
question Question
Which of the following commit messages would be most appropriate for a hypothetical commit made to our
README.mdfile?
- “Update README file”
- “Added line ‘We use this repository as an example’ to README.md”
- “Added purpose description to the README file”
solution Solution
One can argue on the appropriatness of commit messages as it is subjective. In this case however, the third options seems most ideal. It’s both not too generic and not too specific.
question Question
What has happened after committing?
- We saved a version of the file which is now visible on GitHub.com
- We saved a version of the file which is now stored in our commit repository
solution Solution
We’ve been working locally uptil now and didn’t push the commits to the GitHub repository, hence it’s still in our commit repository.
question Question
What would have happened if we forgot about the message argument when committing a file (
-m)solution Solution
If the
-mparameter was not added, git will launch a text editor and ask to write a message. We can not make a commit without providing a message.
3.3 Push commits to GitHub
Recall that when we added the first file on GitHub (exercise 1), it was immediately committed and showed up right away in the GitHub repository. When we change or add files on our computer and commit them, GitHub doesn’t know this yet. Hence, we have to do one final step:
git push
Have a look in the GitHub repository and verify that the new file is now in our repository.
3.4 Stage-commit-push
We’ve learned how to make a GitHub repository, clone it to our computer, add a file, commit it and push it back to GitHub. This is everything you need to know for a routine usage of Git(Hub) on one of your projects. In order to grasp this concept a bit better, we’ll repeat it by making changes on both files in the next exercise.
hands_on Exercise 2
Add a title to both files (“# Title plot 1” and “# Title plot 2”). You can choose how you do this: e.g. open the files in a text editor and add the line on top of the file. Follow the routine steps to push your changes to our GitHub repository, however to make it a bit more difficult, you need to store the changes of both files in separate commits.
solution Solution
After adding the titles, use the following commands
git add plot1.R
git commit -m "Added a title to plot1.R files"
git add plot2.R
git commit -m "Added a title to plot2.R files"
git push
We first added the changes of
plot1.Rin the staging area, then we commit those changes in a given commit. Afterwards, we add the changes ofplot2.Rin the staging area and subsequently commit them. Finally, we use push to push all the latest commits together towards GitHub.
3.5 Commit all tracked files at once
One thing we haven’t really said until now is that Git actually keeps track of the changes that you make to files as soon as you have told Git to do so. The first thing you have to do when you add a new file, is to tell Git to keep track of changes made in this file. If you do not do this, Git will know that there is a new file, but it will classify it as untracked. After adding it to the staging area a first time, it will always keep track of the changes in this file.
On the premise that Git is already keeping track of the files, you can simply do git commit -a -m "some informative text" in which -a stands for add all changes in all files to the staging area and commit them at once.
4. Create a new repository from your computer
As discussed here above, you can also create a Git repository from your computer. This is especially useful when we already have a project with a bunch of files which we now want to start version controlling. The first thing that we will do is initialize Git on this folder. Alternatively, make a new folder which will contain the files of an imaginary project in case you don’t have one yet. In Git Bash (Windows) or in your Terminal (Mac, Linux), move to the project folder with cd and use the following command:
git init
Unfortunately, it is not possible to create a GitHub repository from our computer. Hence, we need to open GitHub and create a new repository and DO NOT initialize it with a README.md, .gitignore or a license. It is important that it is empty in the beginning. We can add those files later.
Once created, GitHub will seggest commands that you might want to use on the Terminal to push our first changes to this GitHub repository.
We already initialized Git in our folder, so we can skip this step:
git init
THe following steps basically ask us to commit our first changes. Given that we edited the README file:
git add README.md
git commit -m "first commit"
Here comes the tricky part. We will learn about branches in Chapter 5, however it suffises for now to understand that each branch carries a name and the default one is now called main where it earlier was called master. The following command will overwrite the name of the branch to main.
git branch -M main
Then, we need to link the repository on our computer to the one on GitHub with:
git remote add origin git@github.com:tmuylder/testtt.git
And finally push our commit to GitHub. The argument -u or --set-upstream will set the remote as upstream (see later):
git push -u origin main
question Question
What if we want to create a new folder inside the folder which we are using for version controlling? Do we need to initialize Git inside this subfolder as well?
solution Solution
It is important to note that
git initwill keep track of all the subdirectories and their files that are in the folder. Thus, you don’t need to create a git repository for each folder or subdirectory. Git repositories can interfere with each other if they are “nested”: the outer repository will try to version-control the inner repository. This will lead to errors.
question Question
How can we know whether a folder is already initialized with Git, meaning that we are already version controlling the project?
solution Solution
If we use
ls -alwe get a list of all files and directories, including the hidden ones. A.gitfolder is present when the project is being version controlled. Git uses this special directory to store all the information about the project like the history of all commits. If we ever delete the.gitsub-directory, we will lose the project’s history.Another possibility is to use the
git statuscommand which results in fatal: not a git repository… if the project is not being version controlled.
Before starting with the next exercise we also want to stress the importance of not uploading data to GitHub. It’s good practice to have links to data, however not the data itself. GitHub is not your next cloud storage instance.
hands_on Exercise 3
Find a folder on your computer with some files that you want to version control, initialize Git on that folder and make it (privately) available on GitHub.
solution Solution
See the steps in Section 4.
5. The strength of the staging area
Now you’re probably wondering why it’s useful to have that many steps to save a file (add, commit, push). We will give a practical example based on the figure below:
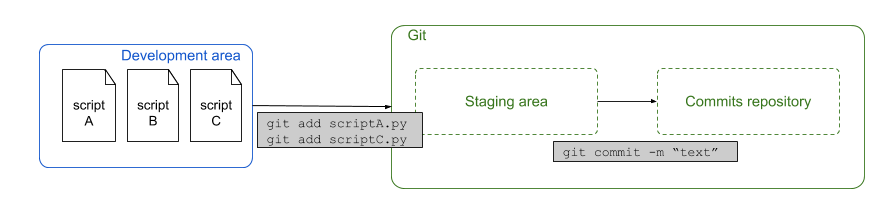
Imagine that you’re working on a project with multiple Python scripts and you’re working on all of them. In this case your folder in your development area contains the files scriptA.py, scriptB.py and scriptC.py. The changes that you made in script A and script C are somehow related, but script B is not. It’s good practice to make commits in which changes that are related to each other are bundled. Hence, in this case we want to make one commit with the changes from file A and C. Now we can simply add scripts A and C to the staging area and commit it. The changes in script B will remain unsaved until we commit the changes in a separate commit.
It’s always better to have more commits; in case you want to remove part of your work in a later stage, or you want to start your work again from a specific commit.
6. Pull
Imagine that you change something in a file on GitHub, or upload a new file online via GitHub. We would want to include these changes or that file in the folder on our computer as well. For this we need to use the pull command to pull in the changes from GitHub.
Let’s go back to our repository on GitHub. We will make a change in the repository on GitHub and then pull these changes back into the repository on our computer (i.e. the project folder on our computer).
Click on the README.md file in the list of files and click the pencil icon on the upper right. The file will open in an editor mode and we can change the title from introduction-github to Introduction GitHub or we can add some more descriptive text. Note that a README file is by default a markdown-file. Markdown is a text file with lay-outing options. If you haven’t heard of it before, it’s worth some further reading.
Save the changes by committing them as depicted here below:
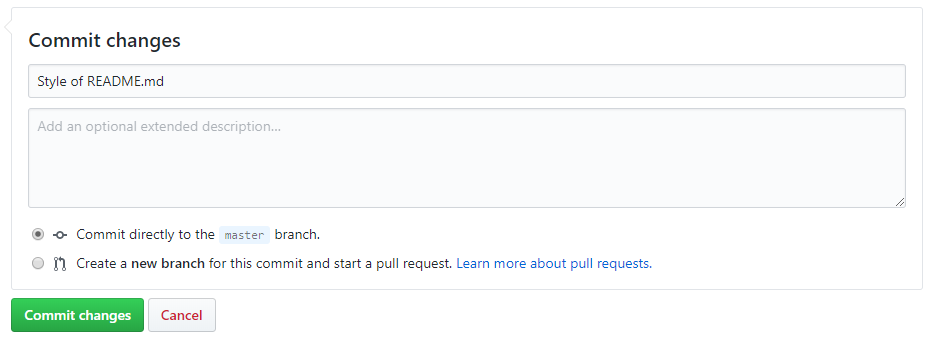
GitHub is now one commit ahead of our local repository. Hence, we have to pull this commit into our local repository. We can do this by using the following command:
git pull
Open the file README.md and check whether the changes have merged in.
Let’s go to the next session!