01 Introduction to Jupyter
question Questionsobjectives Objectives
- How to get started with Python?
- Install Anaconda & Jupyter Notebooks
- Execute a Python expression in the Jupyter Notebook environment
- Use Jupyter Notebooks and its shortcuts for Python programming
time Time estimation: 15 minutes
1.1 Why Jupyter
Jupyter is an interactive code environment that allows you to write code and get immediate feedback from it. It’s one of the most popular environment for Python programming. Especially for training purposes, as it interactively gives you your code and some informative text together.
1.2 Installation
The easiest way to install Python and Jupyter is to install Anaconda (Navigator) on your computer. Anaconda Navigator contains several (GUI) applications like Jupyter in which you can run your Python code. As a side note, Anaconda is also a package manager which makes it ideal for reproducibility purposes as well.
Nowadays, Jupyter comes in two versions. More often you will hear about Jupyter Notebooks which is the precursor of Jupyter Lab. The latter has a couple of advantages, however for stability reasons we’ll be using Jupyter Notebooks for now.
hands_on Installation instructions
To install all prerequisites for this course
- Go to Anaconda, scroll a bit down and select the right distribution system (Windows, MacOS or Linux), and download the Python 3.7 version. Follow the installation instructions.
- You should be able to find Jupyter Notebooks within the installed apps now. Otherwise, open the Anaconda Navigator & launch a Jupyter Notebook
- Jupyter Notebooks opens a tab with a list of your folders. Make and/or select a folder in which you want to keep the training materials.
- Find the training materials on our Github repository: Gentle hands on python
- Click the button ‘Clone or Download’ and select ‘Download ZIP’. Finally, extract the zipped file within the folder you just selected or created.
- In Jupyter Notebook you should see the materials now.
1.3 Getting familiar with Jupyter Notebooks
a. Make a new notebook
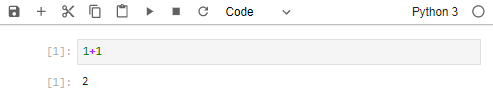
Navigate to a folder and click on the right New –> Python 3. A new Notebook now pops up with an empty cell. In this cell you can directly input some Python code. Try out the following:
1+1
Click on the triangle symbol on the top of the notebook or type ‘Shift+Enter’ to run the code. The output will immediately appear on the screen and should look like this.
Also, a new cell will have appeared in the notebook. A notebook is actually a set of cells in which you can input code.
If you want another cell, you can click the ‘+’ symbol on top of the notebook. Other interesting symbols up there are the stop symbol and the reload symbol. Whenever your code is stuck, you can stop it right there, or whenever you want to restart in a clean and fresh environment, you hit that restart button.
b. Code or Markdown
There are two modes that a cell can have.
- A cell is by default in Code modus. This means that the environment expects a Python code as input and it will interpret it and give you some output upon running that cell.
- The Markdown mode is a kind of text modus. In here you can type any kinds of text and edit it so headers, bold or italic texts, quotes, images are possible to integrate. It’s called rich text. E.g. If you double click this text, you will see the Markdown code of this text.
c. Command or Edit mode
To switch between these modes, hit ‘Esc’ or ‘Enter’. When you hit ‘Enter’, you’ll get into the Edit mode, the cell will have a blue border around it and you’re free to edit the content of that cell (both in python code or markdown code). If you hit ‘Esc’, you’re cell will be in the Command mode and you can use shortcuts to edit your notebook:
- a (above): add a new cell above
- b (below): add a new cell below
- dd: remove the cell
- z: undo the previous action these are just a few of them.
The blue bar on the left of your cell indicates which cell is selected. In command mode, you can move through your cells with the up and down arrow keys.
Lastly, within the command mode, type ‘y’ to change the cell to a Python code cell and type ‘m’ to change the cell to a Markdown code cell.
d. Running a cell
To stress the importance of the ‘stop’ button on top of this notebook, run the following code below. While it is running, the code has an asterisk which means it’s still being executed and your notebook won’t be able to process any other code in another cell. In order to stop it, because it’s an infinite loop, hit the stop button or type ‘ii’ in command mode.
import time
while True:
    print("Hello")
    time.sleep(3)
1.4 Examples
The above will suffice for the Jupyter environment introduction. We will dive into our first examples before diving into the first chapter of our Python adventure.
A program needs information (input) to run, and then needs to export its results so that you know what happened (output). The easiest way to do this is to send a ‘text message’ to the screen; this is possible with the print command which we will introduce here.
In this section we also discuss some basics of Python syntax, and the errors that occur if you don’t get it right.
a. Let’s do some math
Python is very intuitive and flexible in a way that there is no need of special colons, nor do you have to take spaces into account. Just note that Python is indent-sensitive, but we will get back to this.
1+1
2 - 5
3 * 4
10/2
b. Writing a message
The print command allows you to write data to the console screen. Try the following example:
# Print 'Hello world' to the screen
print("Hello world")
Notice that lines starting with a # symbol are not displayed, nor evaluated by Python. They usually contain extra information concerning the code.
# What happens if you leave out the quotation marks?
print(Hello world)
You should get the following error: SyntaxError: invalid syntax. This is because Python doesn’t understand what Hello and world mean.
c. Writing numbers
You can also print out numbers as text messages to the screen. You do not need quotation marks in this case; just the number is enough. If your number does not have a decimal point (.) in it, it’s called an integer, if it does have a decimal point, it is a float.
# Print an integer and a floating point
print(5)
print(3.1415)
Note
In Python, programs often start with:
#!/usr/bin/python
This line is called the ‘Shebang’ and tells the operating system where it can find the Python language interpreter so it can run the program without you having to specify where Python is. With Jupyter Lab/Notebooks we already have a Python environment so we do not need to redefine it every time.
1.5 JupyterLab
With recent improvements, the environment grew a little bit more powerful to a full interface, called JupyterLab. You can see all of the files that are within a folder within a file explorer, you can open a Terminal window which is a Linux machine where you can install any packages that you would need. You can also make a text file or edit text files that are in your folder. However, the most simplest is still to open a Python console where you directly insert python code.
keypoints Key points
- We installed Jupyter Notebooks, a very strong environment for Python programming
- We learned how to write and submit Python code in its simplest form
Useful literature
Further information, including links to documentation and original publications, regarding the tools, analysis techniques and the interpretation of results described in this tutorial can be found here.