1 Introduction
question Questionsobjectives Objectives
- Why should I version control and how to get started?
- How does Git work in its essence?
- Understand why version control is essential in research projects
- Explain how Git's conceptual areas interact
time Time estimation: 20 minutes
1. Introduction
Have you also been in a similar and recognizable situation as depicted below? Saving different versions of your files and scripts is essential to keep track of changes, though it can become chaotic very quickly if we do not use the excellent tools we have available to us. Git is one of these excellent tools. It works similar to Google Docs’ history feature in which Google automatically saves your document and the changes that happened at a particular moment in time. However, Git allows you to control and decide yourself when changes are worth saving, hence making it much more powerful and flexible. Each change is saved together with a message that enables you or your collaborators to keep an overview of the history of the project.

Git is an open-source tool that keeps track of the changes made to your project files throughout their history.
Why should you version control?
- Keeping track of changes to your files done by yourself or your collaborators. At any moment you can exploit the history of the project to see who wrote what on a particular day. It even allows you to go back to a specific version or undo specific edits.
- Synchronizes files between different people or infrastructures (i.e. laptops, servers, …), making it a powerful collaborating system.
- Testing new code/changes. Git can control multiple alternative versions of the same project in which you can make some changes and only when you or your collaborators are happy with hem, you can include them in the main version.
There is a major difference between Git and GitHub though. Git is software that works on your computer, whereas GitHub is a service for connecting and uploading/downloading files much like saving files in the cloud. There are some alternatives for Git (link) which will not be discussed in this course, and there are some for GitHub with Gitlab and Bitbucket as main competitors. These alternatives essentially share the same concepts and therefore we choose for the tools that enjoy the most traction in the community, namely Git and GitHub. In this course we will learn how Git works on your computer, giving us a proper understanding of its functionalities. Grasping these concepts is important if we want to use Git in other apps (e.g. in Chapter 8 we will learn how GitHub and RStudio interact).
2. Installations
For this course we will explore version controlling in a mixture of Git via the command-line and GitHub. The former requires some basic understanding of the Linux command line. If you’re not familiar with Linux command line, you can have a look at the materials here. After discussing Git’s essential features, we’ll introduce how you can setup a collaboration with externals or colleagues, how to integrate version controlling in Rstudio, etc.
- Git can be installed for any OS (Windows, Mac or Linux) from this link. Please keep the recommended and default settings as is.
- Make an account on GitHub.
We will address further configurations in the next chapter.
3. Three conceptual areas
Before diving in, let’s have a look at how Git works. It’s important to understand the three conceptual areas that exist locally when using Git on your computer: the development area, the staging area and the repository containing the commits. We already know that we want to use Git for keeping track of changes in our files. To keep track of those changes we need to run through these conceptual areas: first we edit a file on our computer (development area), then we tell Git about it (add it to the staging area) and lastly we commit those changes (commits repository). Let’s have a closer look:
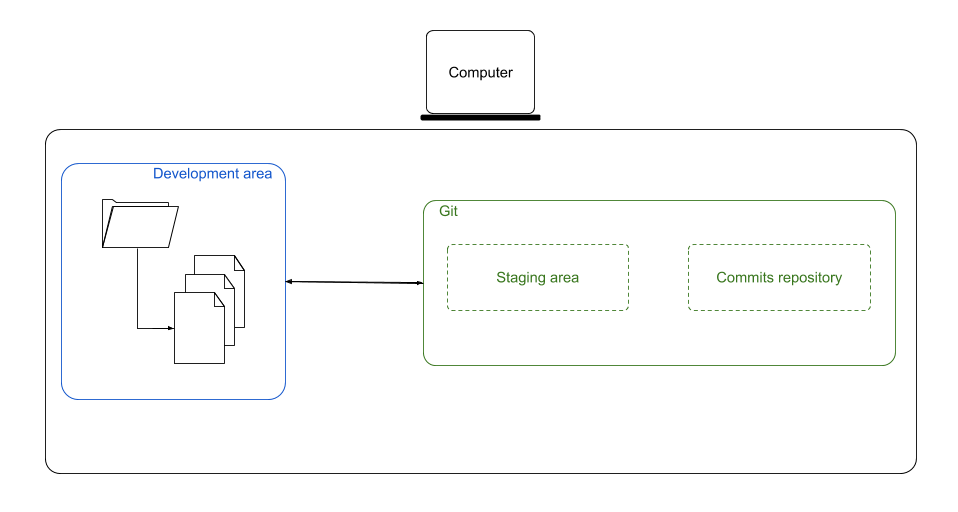
- The development area is where your coding happens. Usually this is a folder with multiple files on your computer. Git will never change anything at this level, actually it won’t really do anything. The only thing Git does is remembering that it needs to keep track of changes made in this folder or its files. However, for this we first need to initialize Git on this folder (only once in the beginning).
- The staging area is an intermediate stage which assembles the files that contain changes. We can select one or multiple files with changes and stage them for a commit. This means that we’re telling Git that we will want to save those changes. Hence, imagine that we want to save a file, we first have to add it to the staging area before we can commit it.
- Files that are in the staging area are then committed to what we’ll call the commit repository. Once we have done that, we stored a specific version of the committed files. Committing is a synonym for saving the files in the Git terminology. The repository with commits contains a list of all the commits that we have done in a project. It’s neatly structured in a history log which we can call at any point. Notice that all of this is still happening on our computer.
Here’s an example. Let’s assume that we’re starting a new project. Usually that also means that you make a new folder on your computer where you will keep all the files related to the project. The first thing you have to do is to tell Git that it has to keep track of this folder.In this step, we’re initializing Git on this folder. Now, you just made your first file. Even though it is stored on your computer, it’s not automatically saved in Git. First, you’ll have to add it to the staging area and afterwards you need to commit it to the repository. When we initialized Git on the folder, a new folder .git/ was created which will store the different versions. That allows us to only have the latest version of the files visible on our computer and all of its histories in the .git/ folder.
If we make a second file, the only thing we have to do is adding it to the staging area and then commit it.
Notice that the repository is not yet visible on github.com. For this we would still need a fourth and last step, namely pushing the commits repository from your computer to GitHub. By pushing your commits repository, you will push the files within the project to GitHub. After this last step, your project and all of the files are accessible in a GitHub repository.
During our adventure through Git & GitHub we’ll use some specific glossary. Confused on what the meaning of all these new words are? Check out the GitHub glossary.
Let’s go to the next session!